Sanitary appliances form a critical part of building services in Kenya, ensuring hygiene and comfort in diverse environments such as hospitals, schools, hotels, and commercial offices. Accurate drawings of these appliances are essential for effective installation, maintenance, and inspection, enabling technicians and engineers to communicate design intent clearly. This chapter introduces various types of working drawings and sketching methods used to represent sanitary appliances, equipping students with skills to produce and interpret technical illustrations relevant across professional sectors.
2.1 Working drawings
Working drawings are technical illustrations that convey detailed information about sanitary appliances, including their dimensions, layout, and connections. In Kenya’s multidisciplinary professional settings, these drawings facilitate coordination among architects, plumbers, and facility managers. Understanding different types of working drawings allows students to produce clear documentation tailored to specific project requirements.
2.1.1 Pictorial
Pictorial drawings provide a three-dimensional representation of sanitary appliances, helping visualize the final installation in a realistic manner.
Purpose of Pictorial Drawings
- Visual Clarity: They present the appliance in a near-real form, making it easier for non-technical stakeholders to understand the design.
- Installation Guidance: Assist technicians by showing how components fit together spatially, reducing installation errors.
- Client Communication: Useful for presentations to clients or facility managers who may not interpret line drawings well.
- Design Validation: Help verify that the appliance fits within the available space without clashes.
- Maintenance Planning: Visualize access points for repairs and routine checks.
Types of Pictorial Drawings
- Isometric Drawings: Show the appliance from an angle where all three dimensions are visible, maintaining scale equally along axes.
- Oblique Drawings: Present the front face in true scale, with depth drawn at an angle for clarity.
- Perspective Drawings: Mimic human eye perception with vanishing points, providing realistic depth but not to scale.
- Exploded Views: Illustrate components separated but aligned to show assembly order.
- Cutaway Views: Reveal internal parts by removing sections of the appliance.
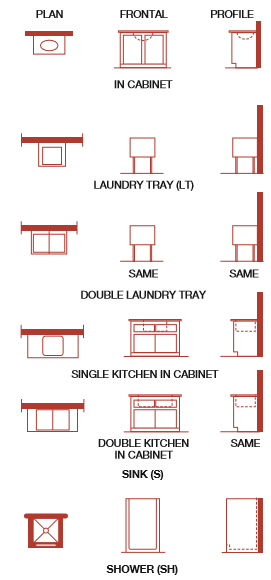
Architectural symbols for various sinks and showers (Source: INSTALLATION_OF_ABOVE_AND_UNDER_GROUND_DRAINAGE_SYSTEM (2))
Construction Procedure for an Isometric Drawing of a Wash Basin
- Draw the Isometric Axes: Begin with three lines intersecting at a point, each 120 degrees apart.
- Mark Key Dimensions: Transfer the length, width, and height of the basin along the respective axes using the scale.
- Sketch the Outline: Connect dimension points to form the basin’s outer shape.
- Add Internal Details: Draw inner bowl contours and rim thickness.
- Include Fixtures: Sketch tap holes and overflow slots.
- Label Components: Mark parts clearly using standard notation.
Standards and Conventions
- Follow BS EN ISO 128 for line types and drawing layout.
- Use continuous thick lines for visible edges and dashed lines for hidden features.
- Apply appropriate scales, often 1:10 or 1:20 for pictorials.
- Include a title block with drawing name-scale, date, and drafter’s name as per Kenya Bureau of Standards (KEBS) guidelines.
2.1.2 Line drawing
Line drawings are two-dimensional representations using lines to convey the shape, size, and details of sanitary appliances. They are essential for fabrication and installation documentation.
Characteristics of Line Drawings
- Simplicity: Focuses on outlines and essential features without shading or textures.
- Precision: Dimensions and proportions are exact, suitable for manufacturing.
- Clarity: Uses varied line types to distinguish visible, hidden, and centre lines.
- Standardization: Employs uniform symbols and conventions for easy interpretation.
- Reproducibility: Easily copied and modified for revisions.
Types of Line Drawings Used in Sanitary Appliance Installation
- Plan View: Shows the appliance from above, detailing footprint and connections.
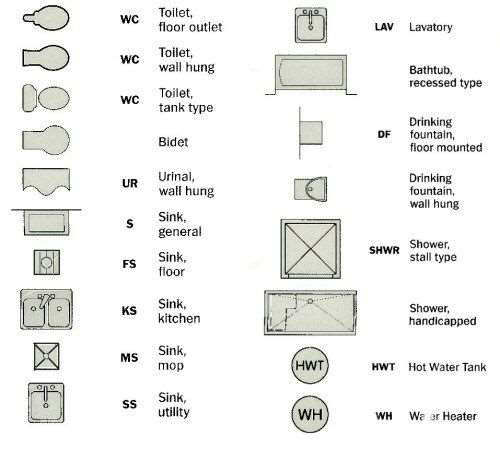
Common plumbing fixture symbols used in construction drawings (Source: PLUMB 5 LEARNING GUIDE-1 (1))
- Elevation View: Side or front view illustrating height and vertical arrangements.
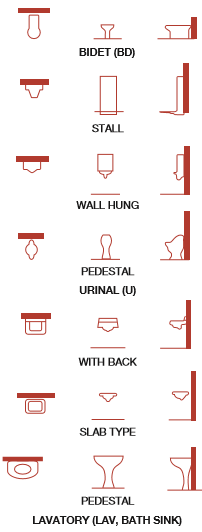
Various types of sanitary fixtures used in construction (Source: INSTALLATION_OF_ABOVE_AND_UNDER_GROUND_DRAINAGE_SYSTEM (2))
Construction Procedure for a Line Drawing of a Toilet Suite Plan
- Set Drawing Scale: Choose an appropriate scale, typically 1:20 or 1:25.
- Draw Outline: Sketch the base footprint of the toilet pan and cistern.
- Add Internal Details: Mark the seat, flushing mechanism, and water inlet.
- Include Pipe Connections: Indicate waste outlet and water supply lines with correct symbols.
- Dimension the Drawing: Add all necessary measurements, including distances to walls and floor levels.
- Annotate: Label parts and include notes on materials or installation requirements.
Line Types and Symbols Standards
- Use BS 8888 and KEBS standards for line types: continuous thick for visible edges, dashed thin for hidden edges.
- Employ standardized sanitary symbols such as circles for taps, rectangles for basins.
- Dimension lines should have arrowheads and be placed outside the drawing.
- Text fonts must be legible and consistent, usually sans-serif.
2.1.3 Freehand sketching
Freehand sketching is a quick, informal drawing method used on-site or in meetings to capture ideas and details without precise instruments.
Importance of Freehand Sketching in Sanitary Installation
- Speed: Enables rapid recording of observations or modifications.
- Communication: Facilitates discussion between installers, clients, and supervisors.
- Problem Solving: Visualizes potential solutions or adjustments on the spot.
- Flexibility: Can be done anywhere without special tools.
- Documentation: Provides a preliminary record before formal drawings.
Techniques for Effective Freehand Sketching
- Use Light Guidelines: Start with faint lines to establish proportions.
- Simplify Shapes: Break complex appliances into basic geometric forms.
- Include Key Details: Focus on dimensions, connection points, and orientation.
- Annotate Liberally: Add notes and measurements directly on the sketch.
- Practice Regularly: Develop hand-eye coordination for accuracy.
Common Tools for Freehand Sketching
| Name |
Specification |
Use |
| Pencil |
HB or 2B graphite pencil |
Provides varied line darkness |
| Eraser |
Soft rubber eraser |
Corrects mistakes |
| Ruler |
30 cm plastic ruler |
Draws straight edges |
| Sketchbook |
A4 size, unlined paper |
Portable drawing surface |
| Pen |
Fine black ink pen |
Finalizes lines |
- Use pencils for initial sketches to allow corrections.
- Maintain a clean and organized sketchbook for future reference.
- Use pens only after confirming accuracy of the sketch.
Practice Procedure for a Freehand Sketch of a Washroom Layout
- Observe the Site: Note the positions of sanitary appliances and walls.
- Draw Perimeter Walls: Sketch the room outline lightly.
- Add Appliance Shapes: Represent toilets, sinks, and showers with simple symbols.
- Mark Connection Points: Indicate water supply and drainage locations.
- Include Dimensions: Approximate key measurements.
- Review and Correct: Adjust proportions and add annotations.
2.1.4 Scale drawings
Scale drawings represent sanitary appliances proportionally reduced or enlarged to fit on paper, essential for accurate planning and construction.
Definition and Importance of Scale Drawings
- Definition: A drawing where all dimensions are proportionally scaled down or up from actual size.
- Accuracy: Ensures precise communication of size and spatial relationships.
- Space Planning: Helps in allocating room for appliances in confined spaces.
- Cost Estimation: Facilitates accurate material quantity calculations.
- Compliance: Meets regulatory requirements for building plans.
Common Scales Used in Sanitary Appliance Drawings
- Full Scale (1:1): Used for small components or detailed parts.
- Reduced Scales (1:10, 1:20, 1:50): Suitable for room layouts and plumbing plans.
- Enlarged Scales (2:1, 5:1): Used for intricate parts requiring clarity.
- Selection Criteria: Depends on drawing size, detail level, and purpose.
Procedure for Preparing a Scale Drawing of a Kitchen Sink Installation
- Choose Scale: Select 1:20 for room layout clarity.
- Measure Actual Dimensions: Record sink size, counter space, and pipe positions.
- Convert Dimensions: Multiply actual measurements by scale factor (e.g., divide by 20).
- Draw Room Outline: Use scaled dimensions for walls and counters.
- Sketch Sink and Fixtures: Position appliances according to scaled measurements.
- Add Notes and Dimensions: Indicate water supply and drainage points.
Tools and Standards for Scale Drawing
| Name |
Specification |
Use |
| Scale ruler |
Dual scale (metric) |
Measures and draws scaled lengths |
| Drawing board |
Flat, smooth surface |
Provides stable drawing base |
| Compass |
Adjustable radius |
Draws arcs and circles |
| Set squares |
30°/60° and 45° angles |
Draws accurate angles |
| Mechanical pencil |
0.5 mm lead |
Produces precise lines |
- Follow BS EN ISO 128 for dimensioning and line conventions.
- Use scale rulers to avoid calculation errors.
- Maintain neatness and clarity for professional presentation.
Practice Questions
- Explain the purpose of pictorial drawings in sanitary appliance installation and list three types of pictorial drawings. (10 marks)
- Describe six steps involved in constructing a line drawing of a toilet suite plan. (12 marks)
- Outline five key techniques for effective freehand sketching in sanitary installations. (10 marks)
- Calculate the scaled length of a 2.4 m kitchen counter on a 1:20 scale drawing, showing all steps. (8 marks)
The rest of this chapter
🔒Create a free account to open more of this chapter.
Free: practical guides, quick cards, workplace scenarios and more.
Create a free account 🔒2.2 Working sanitary drawings interpreted as per work requirements
Working sanitary drawings are essential documents in the installation of plumbing and sanitary appliances within diverse Kenyan workplaces. They provide detailed graphical representations that guide technicians and installers on the exact placement, connection…
🔒2.3 Measurements and symbols of sanitary drawings interpreted as per work requirements
Accurate interpretation of measurements and symbols on sanitary drawings is critical to successful installation and maintenance of sanitary systems in various Kenyan sectors. Whether working in a farm cooperative or a county government office, understanding th…
Chapter Summary
This chapter introduced various types of working drawings essential for sanitary appliances installation, including pictorial, line, freehand sketching, and scale drawings, each serving distinct purposes in visualizing and planning installations. The importance of accurately interpreting working sanitary drawings was emphasized to ensure that installation tasks align with design requirements and site conditions. Students learned how to decode measurements on these drawings to facilitate precise placement and fitting of sanitary appliances. The chapter also covered the standard symbols used in sanitary drawings, enabling clear communication and understanding among professionals involved in plumbing and construction projects. Mastery of these drawing types and symbols is crucial for effective planning, execution, and troubleshooting in sanitary installations. Overall, the chapter laid a foundation for creating and interpreting simple sanitary appliance sketches that meet technical and practical work requirements.
Self-Assessment
🔒 PDFDownload this self-assessment, with answers
A. Written Assessment
- What is the main difference between a pictorial drawing and a line drawing in sanitary appliance sketches? (2 marks)
- Identify two advantages of freehand sketching in the initial design stage of sanitary installations. (2 marks)
🔒20 more in this section.
Chapter Examination Questions
🔒 PDFDownload these examination questions, with worked answers
SECTION A (40 Marks) - Answer ALL Questions
- Define a pictorial drawing and explain its importance when sketching sanitary appliances for a county referral hospital. (4 marks)
- Describe the difference between line drawings and freehand sketches in sanitary appliance installation. (4 marks)
🔒28 more in this section.
Chapter Practical Activities
Practical 1: Freehand Sketching of Sanitary Appliances
Plumbing · Level 5
Sanitary Appliances Installation I
PRACTICAL ASSESSMENT
TIME: 3 HOURS
⬇ PDFCandidate Instructions (Candidate Tool)
Type: Individual
INSTRUCTIONS TO CANDIDATE:
1. You are required to perform the following task:
i. Produce freehand sketches of a water closet, wash hand basin, and kitchen sink showing correct symbols and approximate dimensions on A3 drawing paper.
2. You have been provided with the following resources for the practical task:
| Tools & Equipment | Materials |
|---|
| Pencil HB | Drawing paper A3 size |
| Eraser | Sanitary appliance symbols reference chart |
| Ruler 30 cm | Sanitary appliance working drawing prompt sheet |
⬇ PDFResources Required (Cutting List)
| S/N | Item | Quantity |
|---|
| 1 | Drawing paper A3 size | 1 sheet per Candidate |
| 2 | Pencil HB | 1 per Candidate |
| 3 | Eraser | 1 per Candidate |
| 4 | Ruler 30 cm | 1 per Candidate |
| 5 | Sanitary appliance symbols reference chart | 1 per Candidate |
| 6 | Sanitary appliance working drawing prompt sheet | 1 per Candidate |
⬇ PDFAssessor Guide
| Items to be Evaluated | Marks Available | Marks Obtained | Comments |
|---|
| TASK 1: Preparation and Setup |
Used personal protective equipment (overall and safety boots)
(Award 2 marks for PPE worn or zero) | 2 | | |
Arranged drawing materials and tools correctly
(Award 1 mark or zero) | 1 | | |
| Sub-Total | 3 | | |
| TASK 2: Interpretation and Symbol Identification |
Interpreted working drawing prompt sheet correctly
(Award 2 marks or zero) | 2 | | |
Identified sanitary appliance symbols accurately: water closet, wash hand basin, kitchen sink
(Award 1 mark each or zero) | 3 | | |
| Sub-Total | 5 | | |
| TASK 3: Sketching Sanitary Appliances |
Produced freehand sketch of water closet with correct shape and symbol
(Award 4 marks or zero) | 4 | | |
Produced freehand sketch of wash hand basin with correct shape and symbol
(Award 4 marks or zero) | 4 | | |
Produced freehand sketch of kitchen sink with correct shape and symbol
(Award 4 marks or zero) | 4 | | |
Used approximate correct dimensions for each appliance within ±10% tolerance
(Award 3 marks or zero) | 3 | | |
| Sub-Total | 15 | | |
| TASK 4: Finishing and Cleanup |
Cleaned and stored drawing tools as per best practice
(Award 2 marks or zero) | 2 | | |
Properly disposed of waste paper and scraps
(Award 2 marks or zero) | 2 | | |
| Sub-Total | 4 | | |
| PRODUCT CHECKLIST |
Completed freehand sketches with all three sanitary appliances correctly depicted and labeled
(Award 5 marks for complete and accurate sketches or zero) | 5 | | |
Sketches show correct symbols as per reference chart
(Award 3 marks or zero) | 3 | | |
Sketches maintain approximate dimensions: water closet approx. 400mm wide, wash hand basin approx. 500mm wide, kitchen sink approx. 600mm wide
(Award 4 marks or zero) | 4 | | |
| Sub-Total | 12 | | |
| GRAND TOTAL | 39 | | |
ASSESSMENT OUTCOME: ☐ Competent ☐ Not Yet Competent (competent if at least 50%)
Practical 2: Interpret and position water closet installation points from working sanitary drawing
Plumbing · Level 5
Sanitary Appliances Installation I
PRACTICAL ASSESSMENT
TIME: 4 HOURS
⬇ PDFCandidate Instructions (Candidate Tool)
Type: Individual
INSTRUCTIONS TO CANDIDATE:
1. You are required to perform the following task:
i. Interpret the provided working sanitary drawing and mark installation points for a water closet and cistern with dimensions 600mm height x 400mm width x 300mm depth.
2. You have been provided with the following resources for the practical task:
| Tools & Equipment | Materials |
|---|
| Pipe wrench | Water Closet bowl (sitting type) |
| Pipe cutter | Cistern with flush pipe |
| Hacksaw | 1/2-inch PPR Pipe |
| Tape measure | 4-inch PVC pipe |
| Spirit level | 4-inch Magic bend |
| Marker pen | 1/2-inch Flexible pipe |
| 1/2-inch Elbows |
| 3/4-inch Holding clips |
| 1/2-inch Nails |
⬇ PDFResources Required (Cutting List)
| S/N | Item | Quantity |
|---|
| 1 | Water Closet bowl (sitting type) | 1 complete set per Candidate |
| 2 | Cistern with flush pipe | 1 complete set per Candidate |
| 3 | 1/2-inch PPR Pipe | 1 meter per Candidate |
| 4 | 4-inch PVC pipe | 350 mm per Candidate |
| 5 | 4-inch Magic bend | 1 per 2 Candidates |
| 6 | 1/2-inch Flexible pipe | 1 per Candidate |
| 7 | 1/2-inch Elbows | 3 pieces per Candidate |
| 8 | 3/4-inch Holding clips | 3 pieces per Candidate |
| 9 | 1/2-inch Nails | 6 pieces per Candidate |
| 10 | Personal Protective Equipment (PPE) | Full gear per Candidate |
⬇ PDFAssessor Guide
| Items to be Evaluated | Marks Available | Marks Obtained | Comments |
|---|
| TASK 1: Interpretation and Marking |
Used personal protective equipment in line with occupational safety and health regulations
(Award 2 marks for PPE worn or zero) | 2 | | |
Interpreted the working sanitary drawing correctly to identify installation points
(Award 2 marks or zero) | 2 | | |
Identified symbols on the drawing: water closet and cistern
(Award 1 mark each for correct identification or zero) | 2 | | |
Measured and marked the position for the water closet installation (600mm height x 400mm width)
(Award 3 marks for correct measurements and markings or zero) | 3 | | |
Measured and marked the position for the cistern installation (300mm depth from wall)
(Award 3 marks for correct measurement and marking or zero) | 3 | | |
Identified materials required for fixing based on the drawing: flush pipe, magic bend, pipe fittings
(Award 2 marks for correct identification or zero) | 2 | | |
Identified supplies required for fixing and explained their functions: cistern, valve, water seal, flush pipe
(Award 3 marks for correct identification and explanation or zero) | 3 | | |
Used measuring and marking tools correctly following best practices
(Award 3 marks for correct tool use or zero) | 3 | | |
Cleaned and stored tools and equipment as per manufacturers' instructions
(Award 2 marks for correct cleaning and storage or zero) | 2 | | |
Disposed of waste properly according to environmental standards
(Award 2 marks for proper waste disposal or zero) | 2 | | |
| Sub-Total | 24 | | |
| PRODUCT CHECKLIST |
Installation points marked on site conform to drawing dimensions: 600mm height, 400mm width, 300mm depth
(Award 2 marks for each dimension correctly marked or zero) | 6 | | |
Symbols and installation points clearly and correctly indicated on the working drawing sheet
(Award 4 marks for neat, clear, and correct indications or zero) | 4 | | |
| Sub-Total | 10 | | |
| GRAND TOTAL | 34 | | |
ASSESSMENT OUTCOME: ☐ Competent ☐ Not Yet Competent (competent if at least 50%)
🔒Draw Line Drawings of Selected Sanitary Appliances with SymbolsPractical 3
🔒Create a pictorial drawing of a sitting type water closet with cisternPractical 4
🔒Sketch and Label Common Sanitary Appliance SymbolsPractical 5
🔒Prepare scale drawings of a sanitary appliance layout of a water closet and cisternPractical 6
🔒Marking out and dimensioning sanitary appliance locations from working drawingsPractical 7
🔒Translate pictorial sanitary appliance drawing into detailed working drawing of a sitting type water closet installationPractical 8
🔒Interpret and Plan Installation Using Sanitary Drawing SymbolsPractical 9
🔒Produce complete working drawings for a sanitary appliance installation including scaled views and symbolsPractical 10
